
# GIT基础学习
# 分支
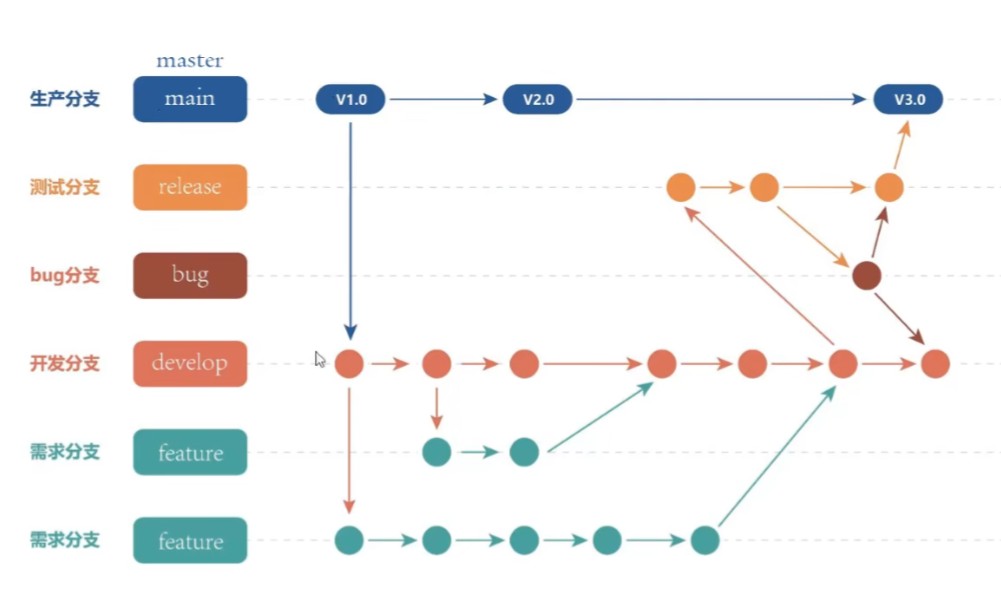
注意:
master(mian):是生产分支,稳定的 一般不在这个分支上进行修改develop: 是 开发分支,这个分支是 不稳定的feature:需求分支,一般来需求 都会在develop分支的基础上,新建一个分支,用于开发新的需求(feature-account-v1.0).- 在需求分支上 改好 需求, 合并到 develop分支上。develop分支再合并到master分支上。
# 常用git命令
- 克隆项目:
git clone 仓库地址 - 查看仓库源:
git remote -v - 创建分支:
git branch <name> - 创建并进入分支:
git checkout -b <name> - 切换分支:
git checkout <name> - 查看状态:
git status(可以在,添加所有文件前 查看修改了 什么文件) - 添加所有文件:
git add . - 提交:
git commit -m "描述文字" - 拉取:
git pullgit pull origin master - 拉取之后看,哪里有修改:
git diff HEAD^ - 推送:
git pushgit push origin master - 查看分支:
git branch --list - 查看分支(包含远程分支):
git branch -a - 删除本地分支:
git branch -d 分支名 - 删除远程分支:
git push origin --delete 分支名 - 合并其他分支到当前分支:
git merge --no-ff -m '描述' < name >(一般用这个)
比如将develop分支合并到master分支:在master分支上:git merge develop(一般不用) 上述两种合并的区别:
(0)将feature合并到master
         A---B---C feature
         /
D---E---F master

(1)git merge feature:
          A---B---C feature
         /         master
D---E---F

这种方法会将 feature中的提交信息也放到master中 会看着乱。master回退上一版本是B;

(2)git merge --no-ff  feature:
          A---B---C feature
         /         \
D---E---F-----------G master
这种方法 master分支会清晰,回退到上一版本是F
2
3
4
5
6
7
8
9
10
11
12
13
14
15
16
17
18
# git仓库使用
# 将本地的项目上传到对应的仓库
这里的本地开发的文件 不是从git仓库中clone下来的。
1.1 去自己做的文件目录下,打开git.bash (进去)
1.2 初始化:git init对应的文件中 会多一个.git文件
1.3 连接远程仓库 git remote add origin 仓库地址
报错:
git error : remote origin already exists解决方法:
1.3.1 先删除远程 Git仓库git remote rm origin
1.3.2 再添加远程Git仓库git remote add origin 仓库地址
1.3.3git add .
指定一个文件:git add src/views/page.vue
1.3.4git commit -m "随意写"
1.3.5git pull origin develop- 报错:
fatal: refusing to merge unrelated histories - 解决:
git pull origin master --allow-unrelated-histories
1.3.7
git push origin develop- 报错:
完成
# 从Git仓库中克隆项目
- 对项目 有新修改 更新到仓库:
git clone 仓库地址git add .git commit -m "随意写"git pull origin developgit push origin develop
- 完成
# 1.1 查看状态git status
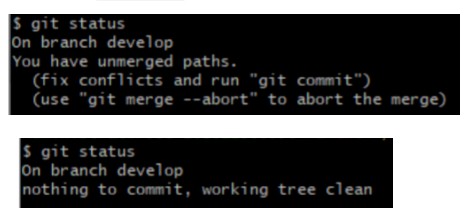
# 1.2 切分支git checkout -b develop
大项目中 前端一般在develop分支上
# 1.3 确认当前所在分支git branch
git branch -a查看所有分支,包括远程分支
# 1.4 查看仓库源git remote -v
# 1.5 删除本地不需要的分支
1.5.1 删除本地分支 git branch -d 分支名
1.5.2 删除远程分支 git push origin --delete 分支名
# 1.6 pull之后 看看哪里有什么修改
1.6.1 查看: git diff HEAD^
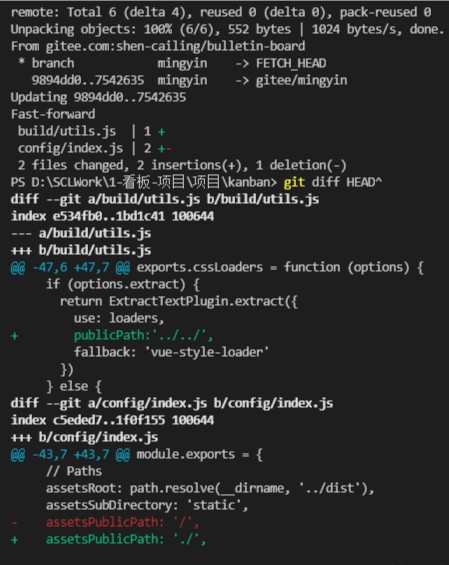
注意:有时候 修改的地方很多,需要退出查看的话,按下: 英文状态下的 q 就可以退出。
# 同时使用多个仓库
# Git 同时使用 github gitee
同时使用多个git仓库
# 2.1 生成SHH公钥
ssh-keygen -t rsa -C "xxxxxxxxxx@xxx.com"
# 2.2 文件 命名
//这个文件自己命名 是为了区分 github 和 gitee
Generating public/private rsa key pair.
Enter file in which to save the key (/Users/liujing/.ssh/id_rsa): id_rsa_github
2
3
//具体路径:
Enter file in which to save the key (C:\Users\64802/.ssh/id_rsa): C:\Users\64802/.ssh/id_rsa_gitlab
2
# 2.3 前面回车 后 提示输入该密钥的密码——直接回车
Enter passphrase (empty for no passphrase):
# 2.4 再次直接回车
Enter same passphrase again:
# 2.5 出现如下界面——成功
Your identification has been saved in id_rsa_test.
Your public key has been saved in id_rsa_test.pub.
The key fingerprint is:
SHA256:hUxxxxxxxxxxxxxxxxxxxxxxxxxxxxxxxxxxxxxxxV4 263xxxx631@qq.com
The key's randomart image is:
+---[RSA 3072]----+
|     .o     . .  |
|     .           |
|    o   . .      |
|     +   .       |
|    +  +S  .     |
|. ===.+ ... + .  |
|..+Eo+o..oo= o   |
|o+==OX ....#.    |
|*=+===+EoO.      |
+----[SHA256]-----+
2
3
4
5
6
7
8
9
10
11
12
13
14
15
16
# 2.6 打开文件 id_rsa_github.pub,复制文件中的公钥
我的路径是:C:\Users\64802\.ssh 下面
mac 电脑上可能找不到对应路径:按 command + shift +G,在弹框中 输路径就可以了
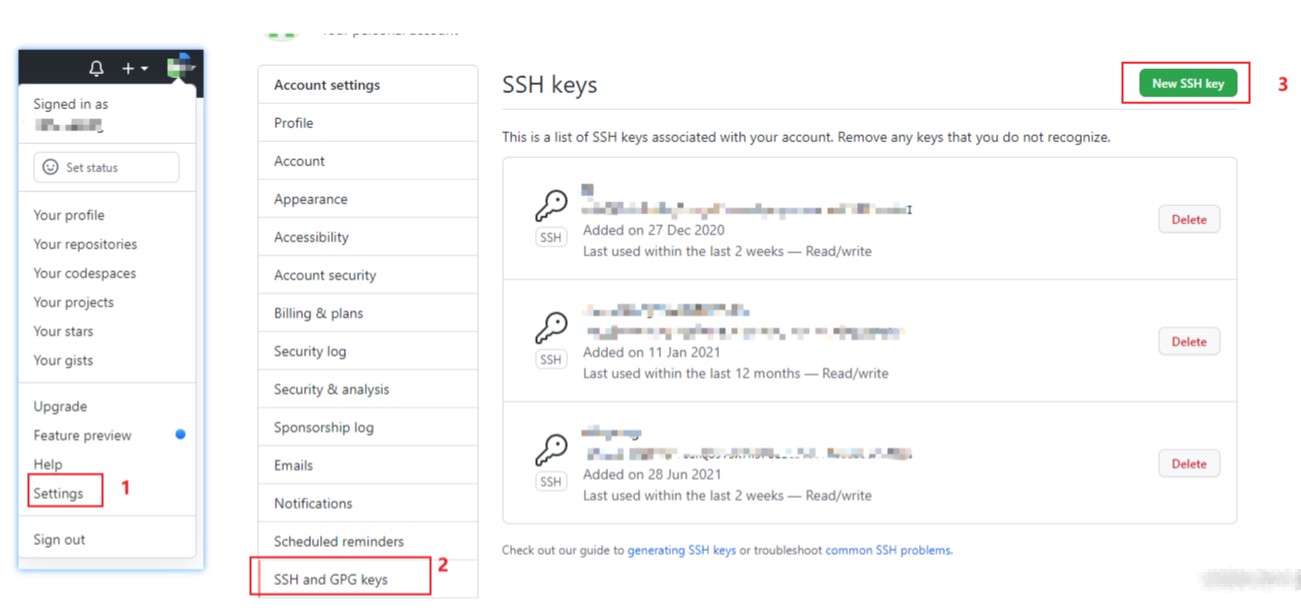
# 2.7 进入自己的github仓库
在 设置 中,添加新的SSH——将上面复制的公钥粘贴进入就好
# 2.8 gitee配置方式如上,在命名区分github就可以
//这个文件自己命名 是为了区分 github 和 gitee
Generating public/private rsa key pair.
Enter file in which to save the key (/Users/liujing/.ssh/id_rsa): id_rsa_gitee
2
3
# 2.9 添加配置文件(重点)
在
.ssh/目录下 ,新建config文件:写入如下的内容
# github
Host github.com
HostName github.com
PreferredAuthentications publickey //这一行 可不写
IdentityFile ~/.ssh/id_rsa_github

# gitee
Host gitee.com
HostName gitee.com
PreferredAuthentications publickey // 这一行 可不写
IdentityFile ~/.ssh/id_rsa_gitee

//现在自己电脑上用的
Host github.com
    HostName github.com
    IdentityFile ~/.ssh/id_rsa

Host gitee.com
    HostName gitee.com
    IdentityFile ~/.ssh/id_rsa_gitee

Host 192.168.1.110
     HostName 192.168.1.110
     IdentityFile ~/.ssh/id_rsa_gitblit
2
3
4
5
6
7
8
9
10
11
12
13
14
15
16
17
18
19
20
21
22
23
24
# 2.10 测试连接
# 测试 Github 连接
$ ssh -T git@github.com

# 测试 Gitee 连接
$ ssh -T git@gitee.com
2
3
4
5
第一次连接需要添加到可信任列表
The authenticity of host 'github.com (13.250.177.223)' can't be established.
ECDSA key fingerprint is SHA256:xxxxxxxxxxxxxxxxxxxxxxxxxxxxxxxxxxxxxxxxxxxxxxx.
ECDSA key fingerprint is MD5:xx:xx:xx:xx:xx:xx:xx:xx:xx:xx:xx:xx:xx:xx:xx:xx:xx.
Are you sure you want to continue connecting (yes/no)? yes     //输入 yes 并回车
2
3
4
# 2.11 完成
出现如下信息 表示完成 可以使用SSH
# Github
Hi Yourname! You've successfully authenticated, but GitHub does not provide shell access.

# Gitee
Hi Yourname! You've successfully authenticated, but GITEE.COM does not provide shell access.
2
3
4
5
6
# 一个项目连接多个仓库
# 3.1 连接多个git仓库时 同时 pull push
PS D:\SCLWork\文荣手机端\W1穿综报产信息报表\项目\wenrongapp> git remote set-url --add origin ssh://scl@192.168.1.110:29418/~scl/wenrong_app_chuanzongbaobiao.git
PS D:\SCLWork\文荣手机端\W1穿综报产信息报表\项目\wenrongapp> git remote -v
origin  git@gitee.com:shen-cailing/wenrong-app.git (fetch)
origin  git@gitee.com:shen-cailing/wenrong-app.git (push)
origin  ssh://scl@192.168.1.110:29418/~scl/wenrong_app_chuanzongbaobiao.git (push)
PS D:\SCLWork\文荣手机端\W1穿综报产信息报表\项目\wenrongapp>
2
3
4
5
6
# 3.2 只是简单的想要给项目添加多个git仓库
git remote add workgit  '仓库地址'
git remote rename old_name new_name  //仓库名字 重命名
2
workgit 自己命名的 后续pull push 都是用 (workgit):
git pull workgit master
git push workgit master
2
刚刚新建git仓库时:将项目添加到仓库
git push -u gitee platform
# 3.3 多个git仓库,多个账户信息
# 3.3.1 这是设置的全局的账户信息
git config --global user.name "xxx"
git config --global user.email "xxx@163.com"

// 取消全局
git config --global --unset user.name
git config --global --unset user.email
2
3
4
5
6
# 3.3.2查看自己配置的账户信息
git config --list

// 查看指定的配置信息
git config user.name
2
3
4
# 3.3.3 给项目 配置 不同的git账户信息
在对应项目下:
git config user.name "xxx"
git config user.email "xxx@163.com"
2
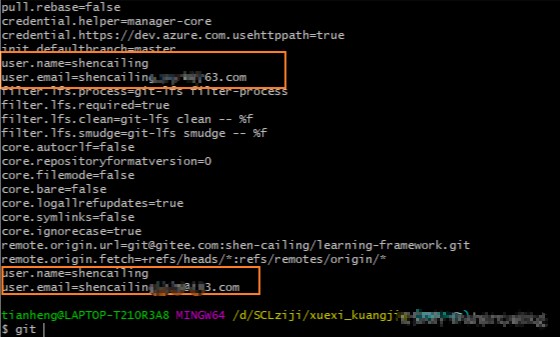
配置好之后 查看信息: 一个是全局的账户信息,一个是特殊的账户信息,会优先使用特殊的账户信息(下面的)
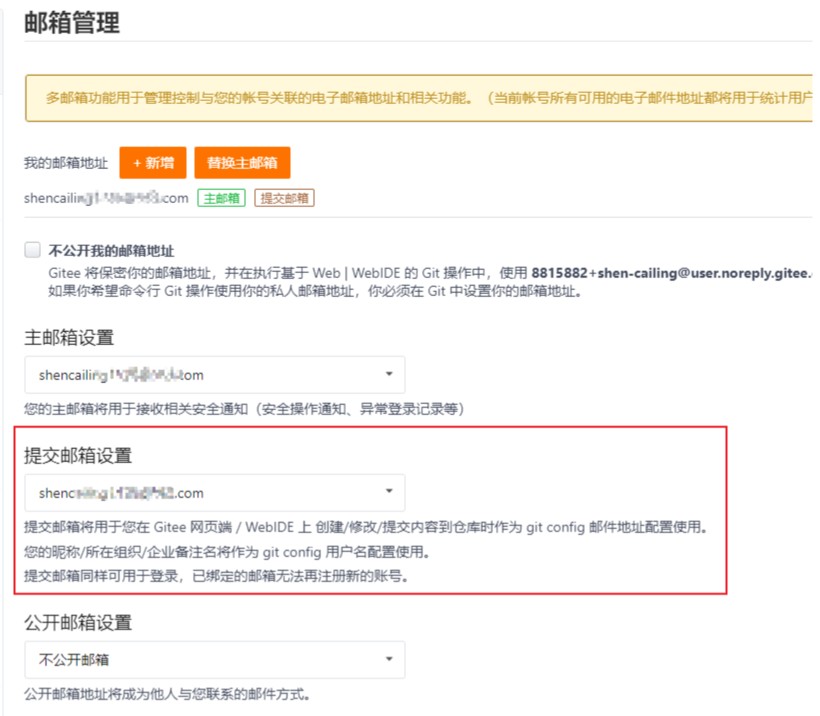
# 3.4 用邮箱 进行 匹配,账号
# 合并分支
# 1. git merge 分支
develop分支合并到master分支:在master分支上: git merge develop
注意分支都需要保持最新状态
# 2. 自己项目中使用的实际例子
首先有两个分支,一个是master分支(本地开发分支),一个prod分支(正式分支); 在master分支上开发完,将master分支合并到prod分支上
# 步骤(都是在 本地分支上操作)
在本地master分支上开发完后,先pull 再push 将修改的内容都更新一下。
将分支切换到 本地prod分支 (注意:本地分支没有origin)(也可以用
git checkout master切换)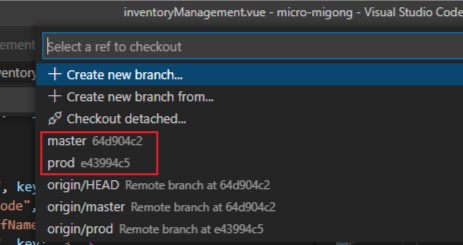
切换到prod分支后,先pull一下,代码同步。
合并 - 合并分支 (也可以用git命令:
git merge master合并)
注意:在 ‘合并到的分支’ 下(这里是prod分支) 操作,选择合并的分支(这里是本地的master) 一下图只是看 分支-合并分支在哪里:**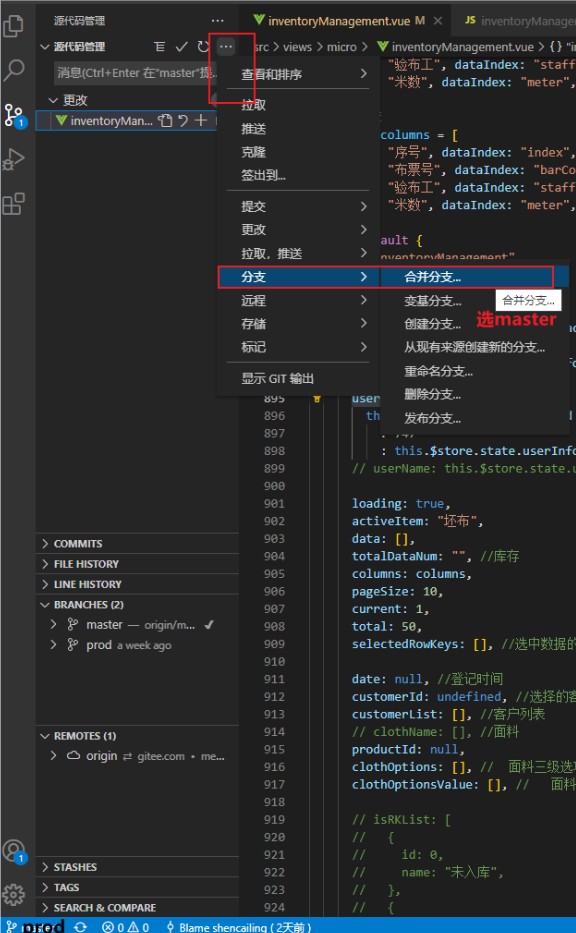
合并操作完成,push 就好(这里是prod分支上操作)
# 撤销退回
# 1|撤销某个版本的操作git revert -n 版本号
特别注意:
git revert -n 版本号只是撤销这个版本号 提交的修改,不影响其他版本号
步骤:
1 git log 查看所有的版本信息
2 git revert -n 版本号 撤销到对应的版本号
3 执行完前面的代码 会产生 冲突
执行完冲突后,git add . git commit -m '提交信息' git push origin master push到仓库
4 再来查看版本信息 会发现多了一个版本信息
注意:从结果可以看到,只撤销了对应版本的操作
# 2|退回 git reset --hard 版本号
退回到这个版本状态,其后面的版本都会没有
步骤: 1 git log 查看所有版本
2 git reset --hard 版本号 回退到对应的版本号
注意仔细看 回退的结果 中间的版本号里的信息都不见了:
3 将结果推送上去
注意:git push 可能会报错 需要
git push -f强制推送
# 恢复单个文件到上一版本
1查看对应文件的版本信息 git log src/view/ceshi.vue 2 git checkout 版本信息 文件路径 比如: git checkout 7fdddjdjskjehshkjhkdjsdhhjcsjhk71 src/view/ceshi.vue
3将代码 push 上去
# 恢复多个文件/恢复文件夹
//恢复单个文件
git checkout 版本信息 src/views/ceshi.vue

//恢复多个文件 用通配符 *
git checkout 版本信息 src/views/ce*.vue

//恢复文件夹
git checkout 版本信息 src/views/
2
3
4
5
6
7
8
# git stash
项目中 有多个分支 1 2, 当前在分支1 中开发,但是现在需要切换到分支2处理其他的问题.
如果不将当前分支的代码commit 使当前分支目录干净是不被允许切换的.
所以需要用stash 暂存 代码 , 是当前分支目录干净 就可以切换了
// 保存当前未 commit 的代码
git stash

//保存当前未 commit 的代码 且 添加备注
git stash save "自己写的备注"

// 列出所有的stash记录  多个记录可以看版本
git stash list

//删除 stash 的所有记录
git stash clear

//应用最近一次的 stash
git stash apply

//应用最近一次的 stash 且 删除该记录
git stash pop

//删除最近一次的stash
git stash drop
2
3
4
5
6
7
8
9
10
11
12
13
14
15
16
17
18
19
20
自己的运用
PS D:\SCLWorks> git stash save "工位机布轴数修改"
Saved working directory and index state On gwj: 工位机修改

PS D:\SCLWorks> git stash save "app布轴数修改"
Saved working directory and index state On master: app修改

//有这么两条stash 记录
PS D:\SCLWorks> git stash list
stash@{0}: On master: app修改
stash@{1}: On gwj: 工位机修改

//应用指定记录于当前分支
PS D:\SCLWorks\常山纺织APP\任务\w5-收布落布\csappweb> git stash pop 1
2
3
4
5
6
7
8
9
10
11
12
13
# 修改commit信息
在本地commit时,想要修改commit信息
提交了commit信息 但是还没有 push到仓库 ,可以修改信息
// 1、可以看到所有版本
git log
// 2、输入一下命令
git commit --amend
// 3、输入 i 插入模式
修改一下 commit的那串文字信息
// 4、文字修改好了 Esc 、 然后 :wq 保存退出
// 5、然后接下来 push 操作就可以
2
3
4
5
6
7
8
# 新建分支
情况描述:需要新建一个test分支;且将分支push到远程
- 直接在本地新建test分支
- 修改完成,一样方式,最后
git push origin test远程仓库会自己新建这个test分支
# 远程已有分支,本地还没有
情况描述:项目先clone在本地了;这时候有人新建了一个test分支,这会导致先前在本地的项目没有这个test分支;需要怎么操作
自己测试:
- 本地新建一个 test 分支
- 直接用
git pull origin test就可以拉取
以上的方式有点不合理,本地新建的分支会clone当前所在的分支;
百度的方式:(可行的,自己项目有测试使用)
git checkout --track origin/dev (仓库名/需要拉到本地的远程分支名字)
# 报错记录
# git push 时候报错 push不上去
PS D:\SCLWorks\Mes\xxx.xxx\xxx> git push gitblit test
...
remote: Resolving deltas: 100% (492/492)
error: remote unpack failed: error Missing tree a30a706fbbccbd21a1e2e3e36a41e8e424d9441f
fatal: Cannot receive pack:
To ssh://1xxxx.1.110:29418/~xxx/xxx.git
 ! [remote rejected] test -> test (n/a (unpacker error))
error: failed to push some refs to 'ssh://192.xxx.1.xxx:29418/~xxx/xxx.git'
2
3
4
5
6
7
8
解决方式:
git push --no-thin gitblit test
GIT的报错记录 →