
# vue学习的准备工作. vue脚手架安装VUE CLI. 新建项目
前言:Vue学习的准备工作:环境的安装准备、脚手架的搭建、项目的新建。
# 安装 node.js 环境
# 1 安装node.js
根据自己的电脑,选择相应的node版本: 这是node官方下载的地址 (opens new window)
# 2 测试一下是否装好 node 和 npm
安装完node.js npm就顺带装好了 :
2.1 测试node是否装好、测试npm是否装好 :
PS D:\SCLziji\xuexi_kuangjia> node -v
v14.17.3
PS D:\SCLziji\xuexi_kuangjia> npm -v
6.14.13
2
3
4
注意:是小写v ,上述表示node和npm是装好的。
# 安装vue CLI 脚手架
安装的版本可选
这是安装脚手架的官方网站 (opens new window)
1 拉取旧版本:
npm install-g @vue/cli-init
2 安装新版本的命令:
npm install -g @vue/cli
如果在这之前 已经安装有旧版本 可以先用一下命令 将旧的版本卸载,再安装写的版本
npm uninstall vue-cli -g
3 查看安装的版本:
$ vue -V
@vue/cli 4.5.13
2
# 创建脚手架项目
# 1 旧版本,新建项目
vue init webpack 项目名称

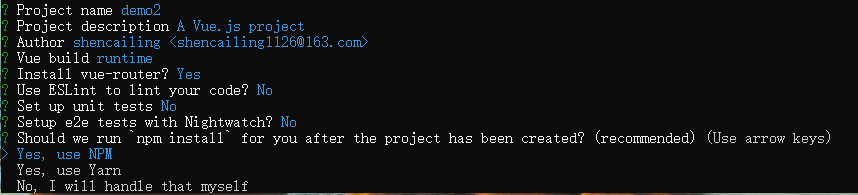 Runtime-Compiler 和 Runtime-only的区别:(Runtime-only体积会小一点)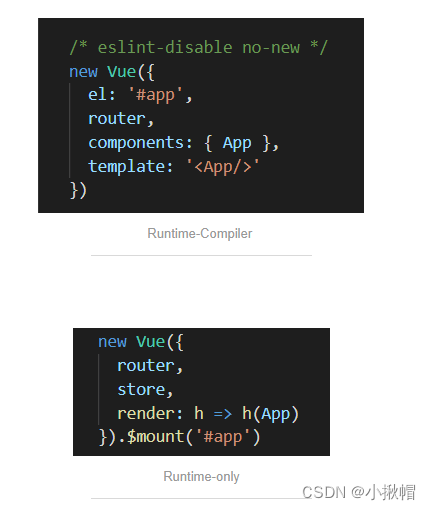
# 2 新建项目
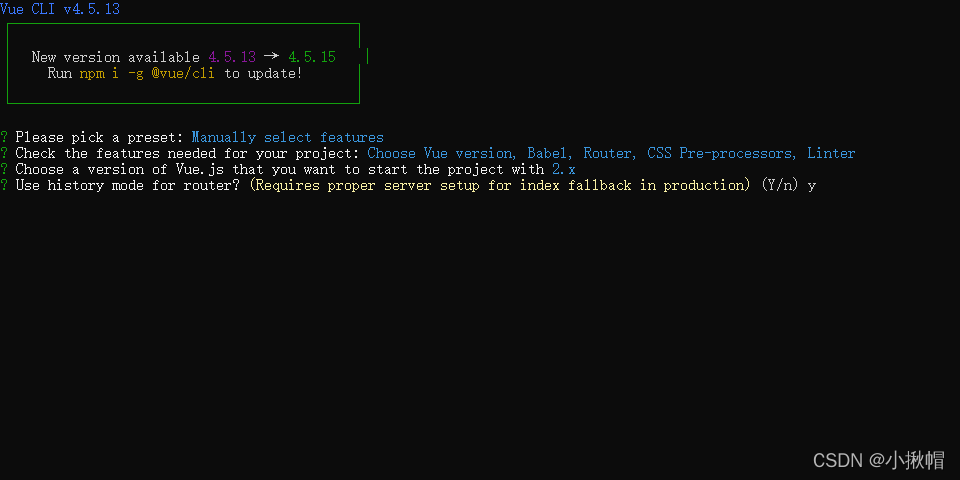
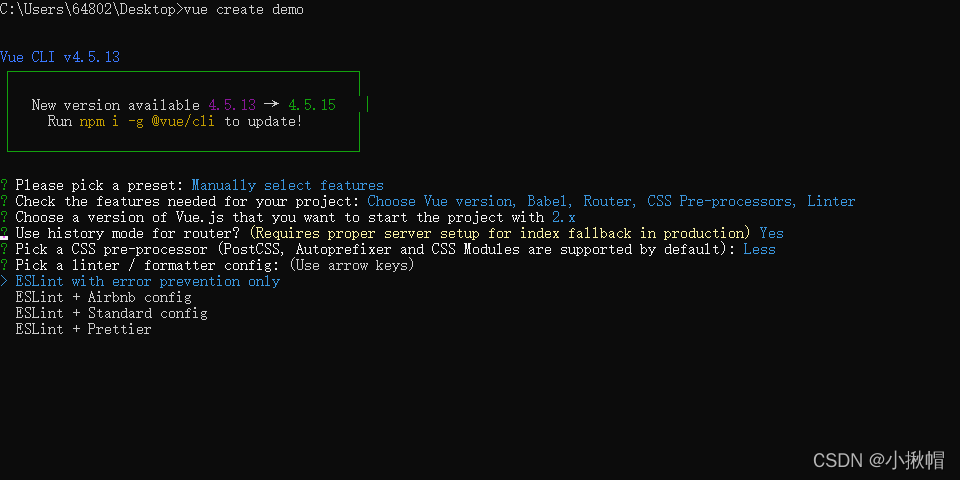
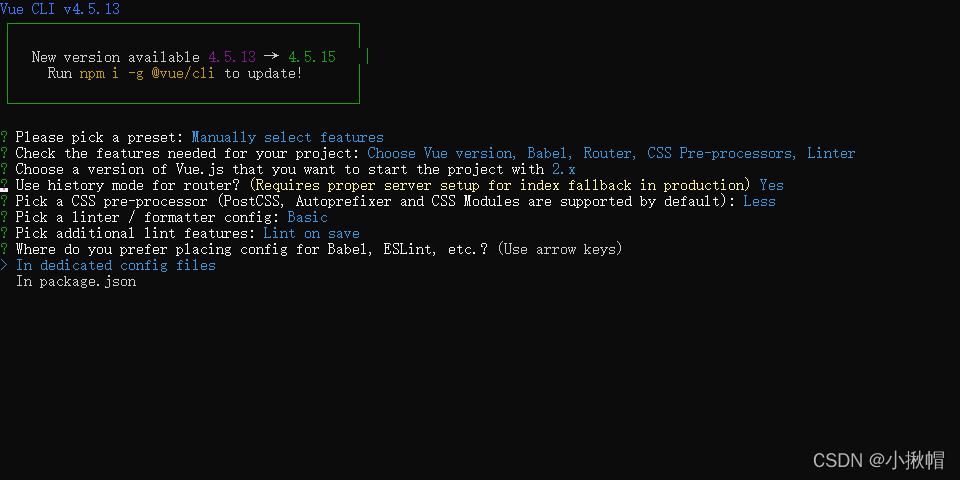
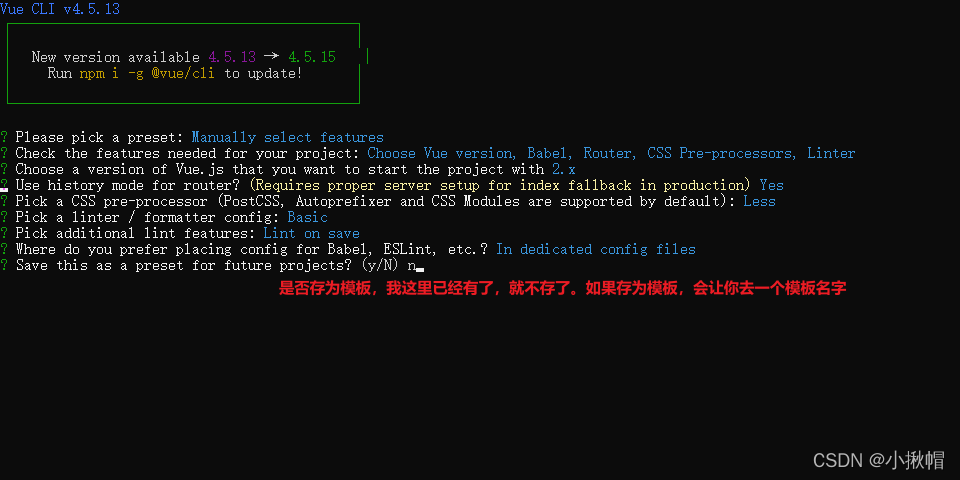
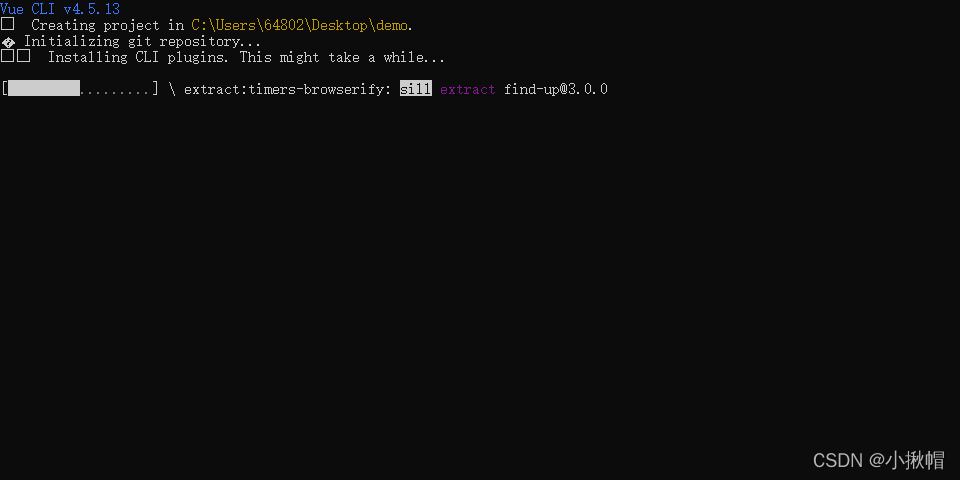
1、在对应的文件夹下面 输入下面的代码:
vue create 项目名称
==2、自定义项目 选择如下:==


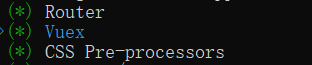
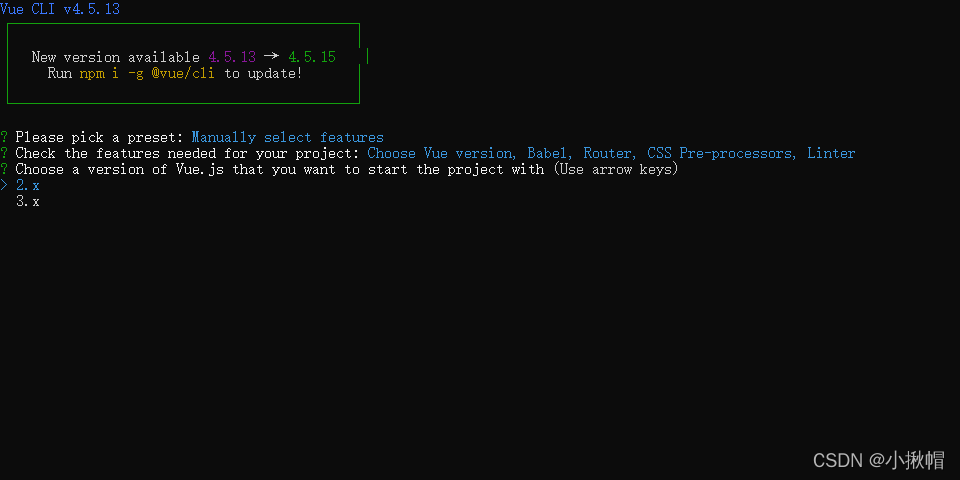
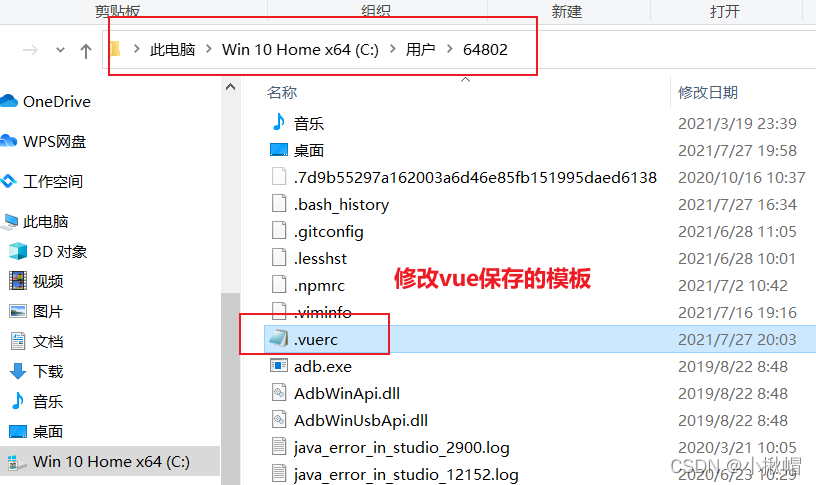
# 3 保存的模板太多 进行删除
# vue2 项目 环境配置
# 项目1 区分运行环境和打包环境
项目可参考:vue2env 可在仓库中查看到
不同命令运行,使用不同环境
开发环境:npm run dev
生产环境:npm run dev:th
不同命令打包,使用不同环境
生产环境:npm run build
开发环境:npm run build:test
以下是具体配置步骤说明:
区分打包环境步骤
# 步骤1:package.json文件
scripts下 添加 build:test: node build/build_test.js
 "scripts": {
    "dev": "webpack-dev-server --inline --progress --config build/webpack.dev.conf.js",
    "dev:th": "webpack-dev-server --inline --progress --config build/webpack.th.conf.js",
    "build": "node build/build.js",
    "build:test": "node build/build_test.js"
  },
2
3
4
5
6
# 步骤2:build文件夹
- 复制build.js文件并重命名为build_test.js,文件名和package.json文件中加的命令对应。 步骤3:config文件夹
- 复制 prod.env.js并重命名为test.env.js,用来配置测试环境;
- 修改 test.env.js文件,NODE_ENV为testing;如下:
// 打包 生产环境
'use strict'
module.exports = {
  NODE_ENV: '"production"',
  API_REPORT: '"http://125.124.189.141:8227"',
  API_8237: '"http://125.124.189.141:p8237"'
}
2
3
4
5
6
7
// 打包 测试环境
'use strict'
module.exports = {
  NODE_ENV: '"testing"',
  API_REPORT:'"http://192.168.10.22:84/p8227"',
  API_8237:'"http://192.168.10.22:84/p8237"'
}
2
3
4
5
6
7
# 步骤4:build文件夹
- 修改build_test.js文件内容:process.env.NODE_ENV = 'testing'
- 注意:和config中的test.env.js中的NODE_ENV配置相对应,表示使用测试环境配置进行打包
# 步骤5:build文件夹
- 修改webpack.prod.conf.js文件中的env,如下:
const env = process.env.NODE_ENV === "production" ? require('../config/prod.env') : require('../config/test.env')
因为testing环境是自己后来加,所以需要配置一下testing环境打包的文件路径
# 步骤6:config文件夹
- 修改index.js文件 ,复制build部分,重命名test。
'use strict'
// Template version: 1.3.1
// see http://vuejs-templates.github.io/webpack for documentation.

const path = require('path')

module.exports = {
  dev: {

    // Paths
    assetsSubDirectory: 'static',
    assetsPublicPath: '/',
    proxyTable: {},

    // Various Dev Server settings
    host: 'localhost', // can be overwritten by process.env.HOST
    port: 8080, // can be overwritten by process.env.PORT, if port is in use, a free one will be determined
    autoOpenBrowser: false,
    errorOverlay: true,
    notifyOnErrors: true,
    poll: false, // https://webpack.js.org/configuration/dev-server/#devserver-watchoptions-


    /**
     * Source Maps
     */

    // https://webpack.js.org/configuration/devtool/#development
    devtool: 'cheap-module-eval-source-map',

    // If you have problems debugging vue-files in devtools,
    // set this to false - it *may* help
    // https://vue-loader.vuejs.org/en/options.html#cachebusting
    cacheBusting: true,

    cssSourceMap: true
  },

  build: {
    // Template for index.html
    index: path.resolve(__dirname, '../dist/index.html'),

    // Paths
    assetsRoot: path.resolve(__dirname, '../dist'),
    assetsSubDirectory: 'static',
    assetsPublicPath: './',

    /**
     * Source Maps
     */

    productionSourceMap: true,
    // https://webpack.js.org/configuration/devtool/#production
    devtool: '#source-map',

    // Gzip off by default as many popular static hosts such as
    // Surge or Netlify already gzip all static assets for you.
    // Before setting to `true`, make sure to:
    // npm install --save-dev compression-webpack-plugin
    productionGzip: false,
    productionGzipExtensions: ['js', 'css'],

    // Run the build command with an extra argument to
    // View the bundle analyzer report after build finishes:
    // `npm run build --report`
    // Set to `true` or `false` to always turn it on or off
    bundleAnalyzerReport: process.env.npm_config_report
  },

  test: {
    // Template for index.html
    index: path.resolve(__dirname, '../dist/index.html'),

    // Paths
    assetsRoot: path.resolve(__dirname, '../dist'),
    assetsSubDirectory: 'static',
    assetsPublicPath: './',

    /**
     * Source Maps
     */

    productionSourceMap: true,
    // https://webpack.js.org/configuration/devtool/#production
    devtool: '#source-map',

    // Gzip off by default as many popular static hosts such as
    // Surge or Netlify already gzip all static assets for you.
    // Before setting to `true`, make sure to:
    // npm install --save-dev compression-webpack-plugin
    productionGzip: false,
    productionGzipExtensions: ['js', 'css'],

    // Run the build command with an extra argument to
    // View the bundle analyzer report after build finishes:
    // `npm run build --report`
    // Set to `true` or `false` to always turn it on or off
    bundleAnalyzerReport: process.env.npm_config_report
  }
}
2
3
4
5
6
7
8
9
10
11
12
13
14
15
16
17
18
19
20
21
22
23
24
25
26
27
28
29
30
31
32
33
34
35
36
37
38
39
40
41
42
43
44
45
46
47
48
49
50
51
52
53
54
55
56
57
58
59
60
61
62
63
64
65
66
67
68
69
70
71
72
73
74
75
76
77
78
79
80
81
82
83
84
85
86
87
88
89
90
91
92
93
94
95
96
97
98
99
100
# 步骤7:build文件夹
- 修改webpack.base.conf.js文件 的publicPath参数
'use strict'
const path = require('path')
const utils = require('./utils')
const config = require('../config')
const vueLoaderConfig = require('./vue-loader.conf')

function resolve(dir) {
  return path.join(__dirname, '..', dir)
}

module.exports = {
  context: path.resolve(__dirname, '../'),
  entry: {
    app: './src/main.js'
  },
  output: {
    path: config.build.assetsRoot,
    filename: '[name].js',
    publicPath: process.env.NODE_ENV === 'production'
      ? config.build.assetsPublicPath
      : process.env.NODE_ENV === 'development' ? config.dev.assetsPublicPath : config.test.assetsPublicPath
  },
  resolve: {
    extensions: ['.js', '.vue', '.json'],
    alias: {
      '@': resolve('src'),
    }
  },
  module: {
    rules: [
      {
        test: /\.vue$/,
        loader: 'vue-loader',
        options: vueLoaderConfig
      },
      {
        test: /\.js$/,
        loader: 'babel-loader',
        include: [resolve('src'), resolve('test'), resolve('node_modules/webpack-dev-server/client')]
      },
      {
        test: /\.(png|jpe?g|gif|svg)(\?.*)?$/,
        loader: 'url-loader',
        options: {
          limit: 10000,
          name: utils.assetsPath('img/[name].[hash:7].[ext]')
        }
      },
      {
        test: /\.(mp4|webm|ogg|mp3|wav|flac|aac)(\?.*)?$/,
        loader: 'url-loader',
        options: {
          limit: 10000,
          name: utils.assetsPath('media/[name].[hash:7].[ext]')
        }
      },
      {
        test: /\.(woff2?|eot|ttf|otf)(\?.*)?$/,
        loader: 'url-loader',
        options: {
          limit: 10000,
          name: utils.assetsPath('fonts/[name].[hash:7].[ext]')
        }
      }
    ]
  },
  node: {
    // prevent webpack from injecting useless setImmediate polyfill because Vue
    // source contains it (although only uses it if it's native).
    setImmediate: false,
    // prevent webpack from injecting mocks to Node native modules
    // that does not make sense for the client
    dgram: 'empty',
    fs: 'empty',
    net: 'empty',
    tls: 'empty',
    child_process: 'empty'
  }
}
2
3
4
5
6
7
8
9
10
11
12
13
14
15
16
17
18
19
20
21
22
23
24
25
26
27
28
29
30
31
32
33
34
35
36
37
38
39
40
41
42
43
44
45
46
47
48
49
50
51
52
53
54
55
56
57
58
59
60
61
62
63
64
65
66
67
68
69
70
71
72
73
74
75
76
77
78
79
# 完成
# 区分运行环境步骤:
# 步骤1:package.json文件
修改如下部分:dev:th
  "scripts": {
    "dev": "webpack-dev-server --inline --progress --config build/webpack.dev.conf.js",
    "dev:th": "webpack-dev-server --inline --progress --config build/webpack.th.conf.js",
    "build": "node build/build.js",
    "build:test": "node build/build_test.js"
  },
2
3
4
5
6
# 步骤2:build文件夹
复制 webpack.dev.conf.js且重命名为 webpack.dev.th.js(对应package.json文件的dev:th命令)
# 步骤3:config文件夹
复制dev.env.js且重命名为th.env.js
// 运行 生产环境
'use strict'
const merge = require('webpack-merge')
const prodEnv = require('./prod.env')

module.exports = merge(prodEnv, {
  NODE_ENV: '"development"'
})
2
3
4
5
6
7
8
修改dev.env.js文件: const prodEnv = require('./test.env')
// 运行 测试环境
'use strict'
const merge = require('webpack-merge')
const prodEnv = require('./test.env')

module.exports = merge(prodEnv, {
  NODE_ENV: '"development"'
})
2
3
4
5
6
7
8
注意以上两个NODE_ENV: '"development"'
# 步骤4:build文件夹
修改webpack.dev.th.js文件:
  new webpack.DefinePlugin({
      'process.env': require('../config/th.env')
    }),
2
3
# 访问:
let VUE_REPORT = process.env.API_REPORT;
import axios from 'axios'
let VUE_REPORT = process.env.API_REPORT;

export function ReportForms_api(method, path, companyId, data) {
    let url = VUE_REPORT;
    url = url + path;
    let headers = {
        'Content-Type': 'application/json',
        'companyID': companyId
    }
    return axios({
        url: url,
        method: method,
        data: data,
        headers: headers
    });
}
2
3
4
5
6
7
8
9
10
11
12
13
14
15
16
17
# 完成
# Vue CLI 项目 模式和环境变量
// package.json
 "scripts": {
    "serve": "vue-cli-service serve --mode prod",
    "serve:test": "vue-cli-service serve --mode dev",
    "build": "vue-cli-service build --mode prod",
    "build:test": "vue-cli-service build --mode dev",
    "lint": "vue-cli-service lint"
  },
2
3
4
5
6
7
8
// .env.dev 根目录下和package.json同级
# 开发环境
NODE_ENV=development
VUE_APP_COM=111
# 单表
VUE_APP_REPORT_URL=http://10.168.8.168:8227
VUE_APP_REPORT_URL1=http://47.110.242.174:10086
2
3
4
5
6
7
// .env.prod
# 生产环境
NODE_ENV=production
VUE_APP_COM=111
# 单表
VUE_APP_REPORT_URL=http://10.168.8.168:8227
2
3
4
5
6
# vue怎能配置自定义代码片段
在VSCode中,你可以自定义代码片段。打开VSCode,然后按下 Ctrl + Shift + P(Windows/Linux)或 Cmd + Shift + P(Mac)打开命令面板,输入"Preferences: Configure User Snippets",选择对应语言(例如Vue),然后编辑相应的代码片段。
{
	// Place your snippets for vue here. Each snippet is defined under a snippet name and has a prefix, body and
	// description. The prefix is what is used to trigger the snippet and the body will be expanded and inserted. Possible variables are:
	// $1, $2 for tab stops, $0 for the final cursor position, and ${1:label}, ${2:another} for placeholders. Placeholders with the
	// same ids are connected.
	// Example:
	// "Print to console": {
	// 	"prefix": "log",
	// 	"body": [
	// 		"console.log('$1');",
	// 		"$2"
	// 	],
	// 	"description": "Log output to console"
	// }
	"Custom Vue .vue file": {
		"prefix": "customvue",
		"body": [
		  "<template>",
		  "  <div>",
		  "    $1",
		  "  </div>",
		  "</template>",
		  "",
		  "<script>",
		  "export default {",
		  "  name: '',",
		  "  data() {",
		  "    return {",
		  "      $2",
		  "    };",
		  "  },",
		  "  methods: {",
		  "    $3",
		  "  },",
		  "  mounted() {",
		  "    $4",
		  "  },",
		  "}",
		  "</script>",
		  "",
		  "<style lang='scss' scoped>",
		  "</style>"
		],
		"description": "Custom Vue .vue file"
	  }
}
2
3
4
5
6
7
8
9
10
11
12
13
14
15
16
17
18
19
20
21
22
23
24
25
26
27
28
29
30
31
32
33
34
35
36
37
38
39
40
41
42
43
44
45
46
vue基础 →